Chemical treatment of mites

Chemical treatment of spider mites

Restricting the use of chemicals that cause mite population flares

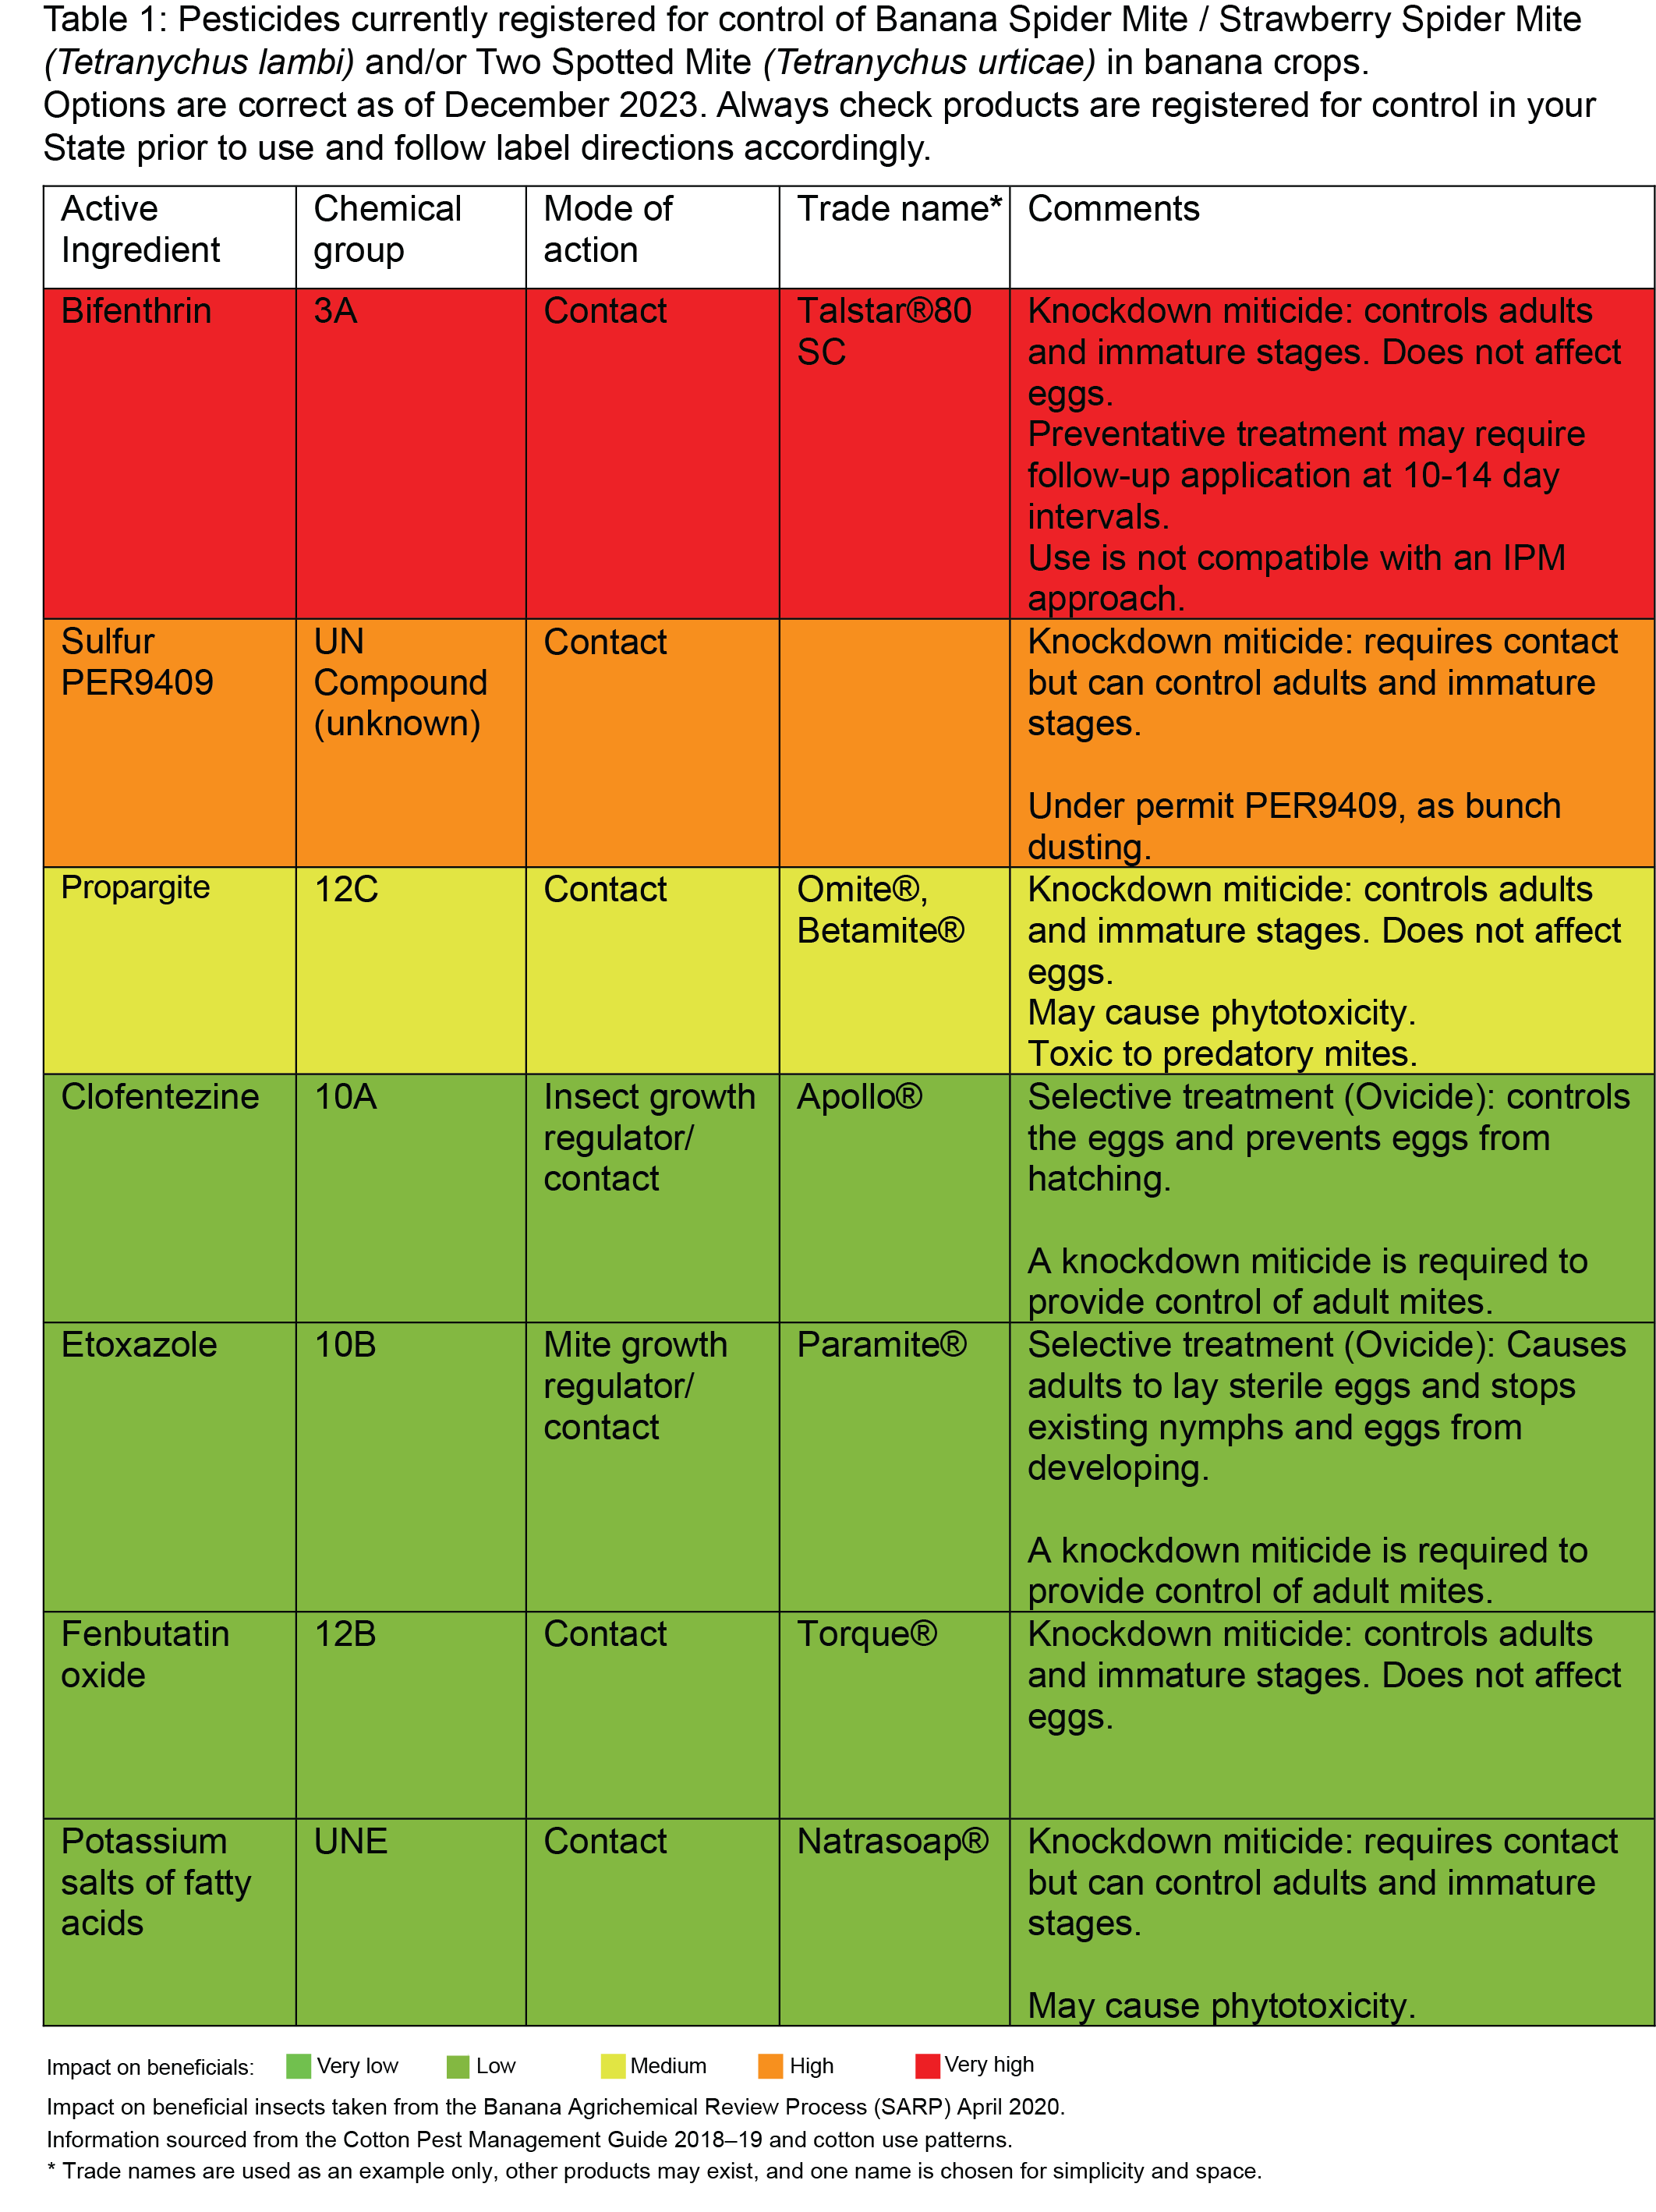
Some chemicals are associated with mite flares. This can be due to several reasons but primarily it is because these chemicals either encourage the mites to lay more eggs (the neonicotinoids, e.g. imidacloprid) or eliminate natural predators (the synthetic pyrethroids, e.g. bifenthrin). Where possible, avoid using these chemicals or if they must be used, time their use to the low-risk periods for mite flares, such as winter.

Correct application of miticides

Firstly, it’s important to check to ensure that live mites are still present and it’s not residual damage that’s still visible. With only a limited number of miticides available to the banana industry, it is important for treatment efficacy and long-term availability of these products that they are applied correctly.

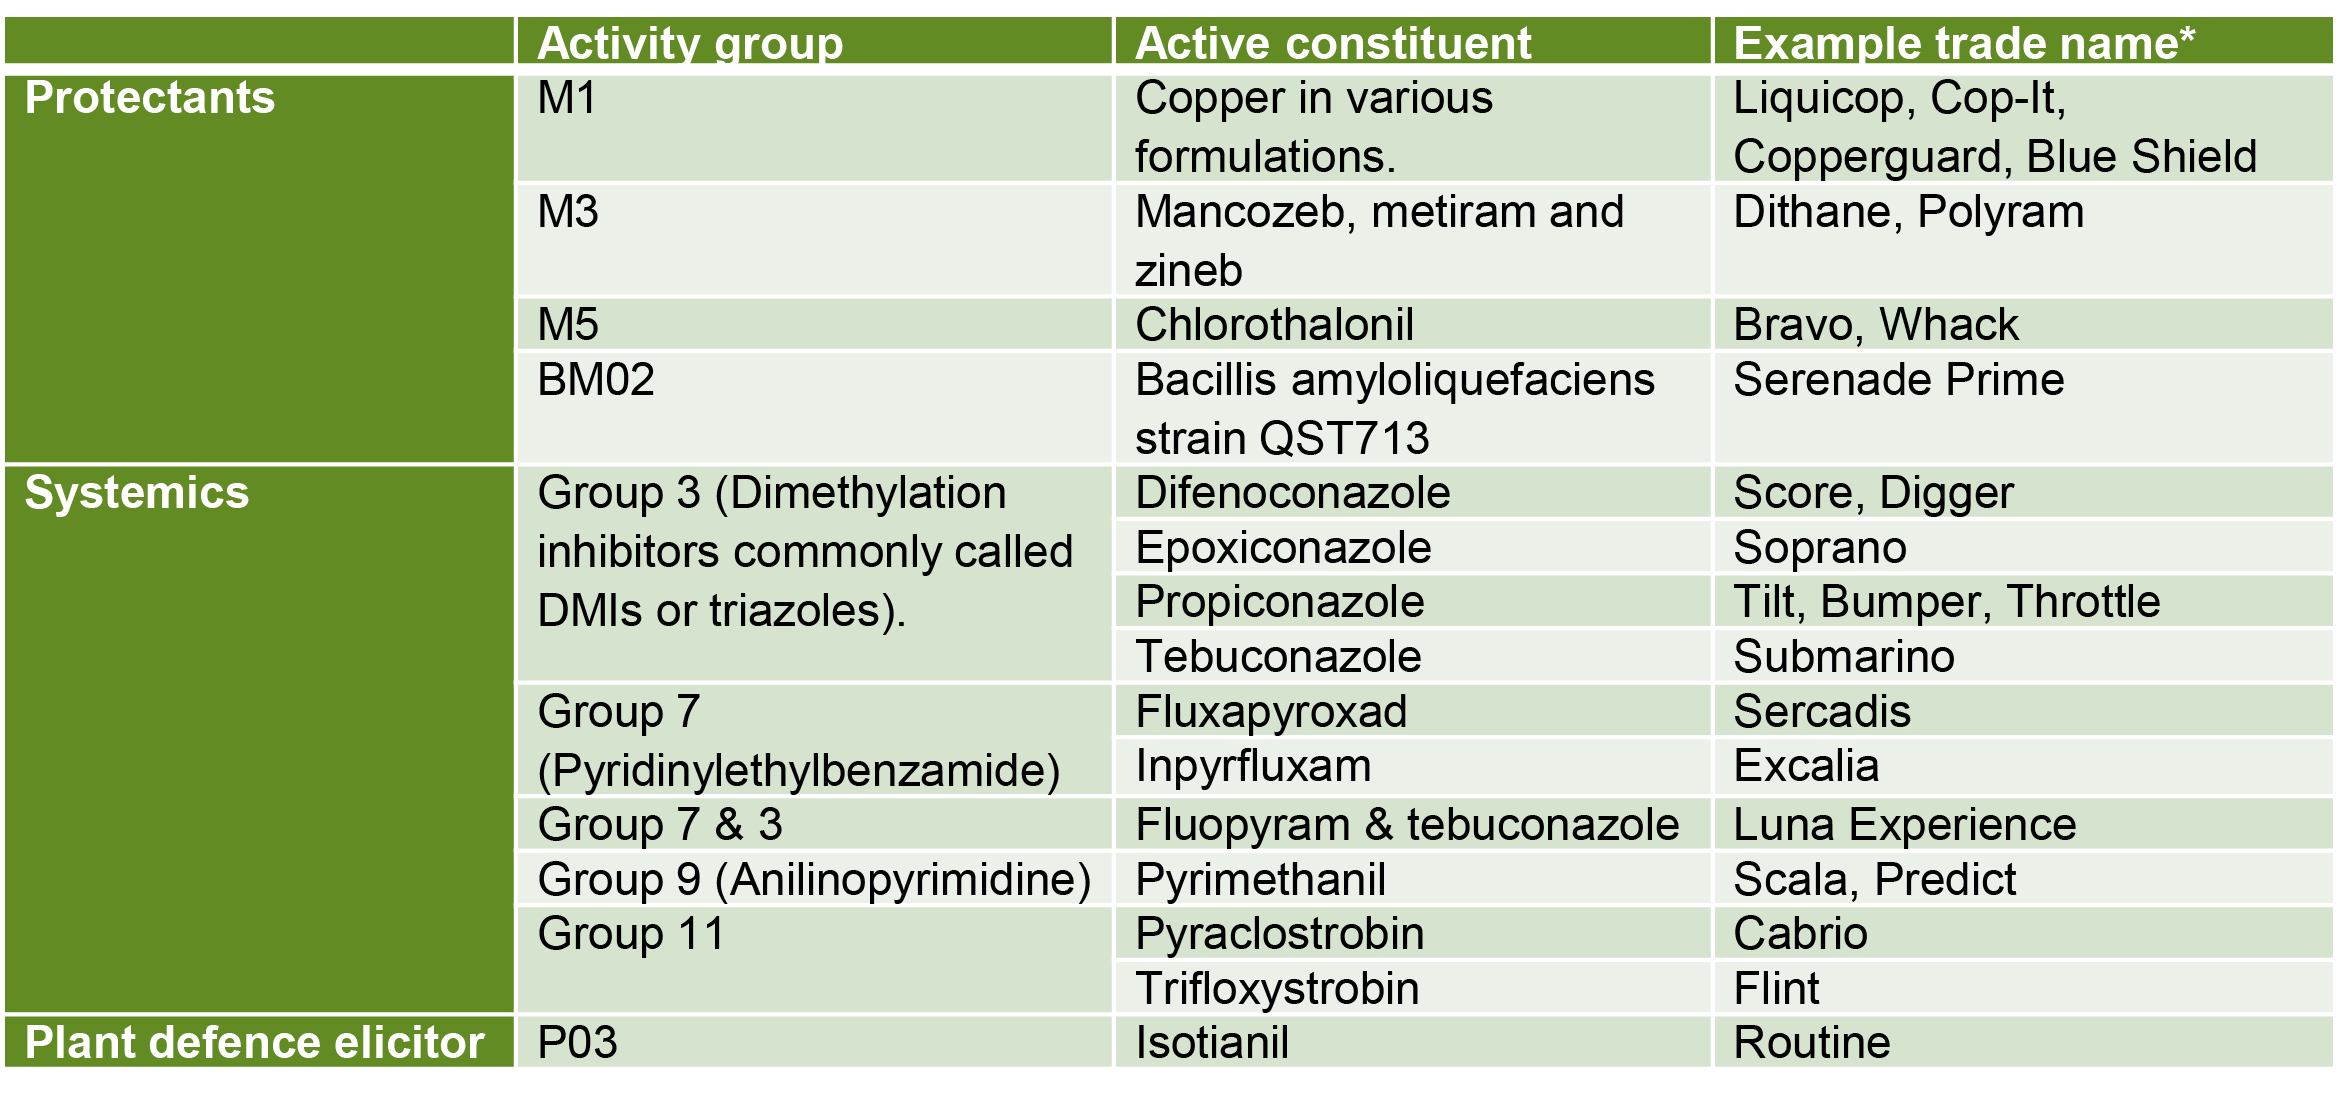
Actives registered for control of spider mites in bananas

Always check the current registration status of chemicals before use by visiting the Australian Pesticides and Veterinary Medicines Authority website (Click here) and always follow label directions.
For more information contact

The Better Bananas team
Department of Agriculture and Fisheries
South Johnstone
Email betterbananas@daf.qld.gov.au 

 
This information is adapted from: Pinese, B., Piper. R 1994, Bananas insect and mite management, Department of Primary Industries, Queensland 
This information has been prepared as part of the National Banana Development and Extension Program (BA19004) which is funded by Hort Innovation, using the banana industry research and development levies and contributions from the Australian Government. Hort Innovation is the grower-owned, not-for-profit research and development corporation for Australian horticulture. The Queensland Government has also co-funded the project through the Department of Agriculture and Fisheries.

Natural predators of spider mites

Natural predators of spider mites

Natural predators are beneficial insects, that actively hunt and consume specific pest species. Spider mites have many natural predators including lady beetles, predatory mites, rove beetles, and predatory thrips. These natural predators need to be protected through conscientious spray programs (avoiding disruptive sprays) and some can be purchased from suppliers for augmentative releases to address spider mite population flares. Here we investigate two of the key natural predators and how they work to control spider mites.

Stethorus

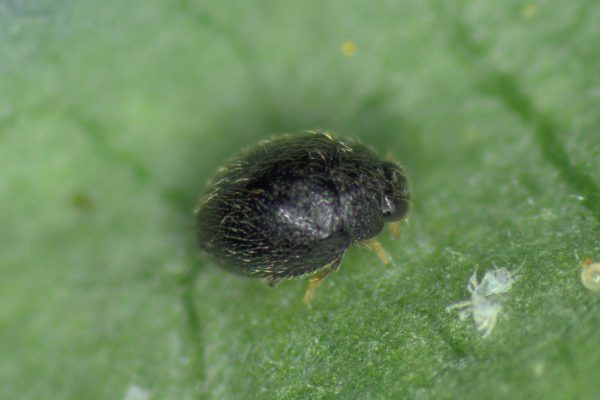
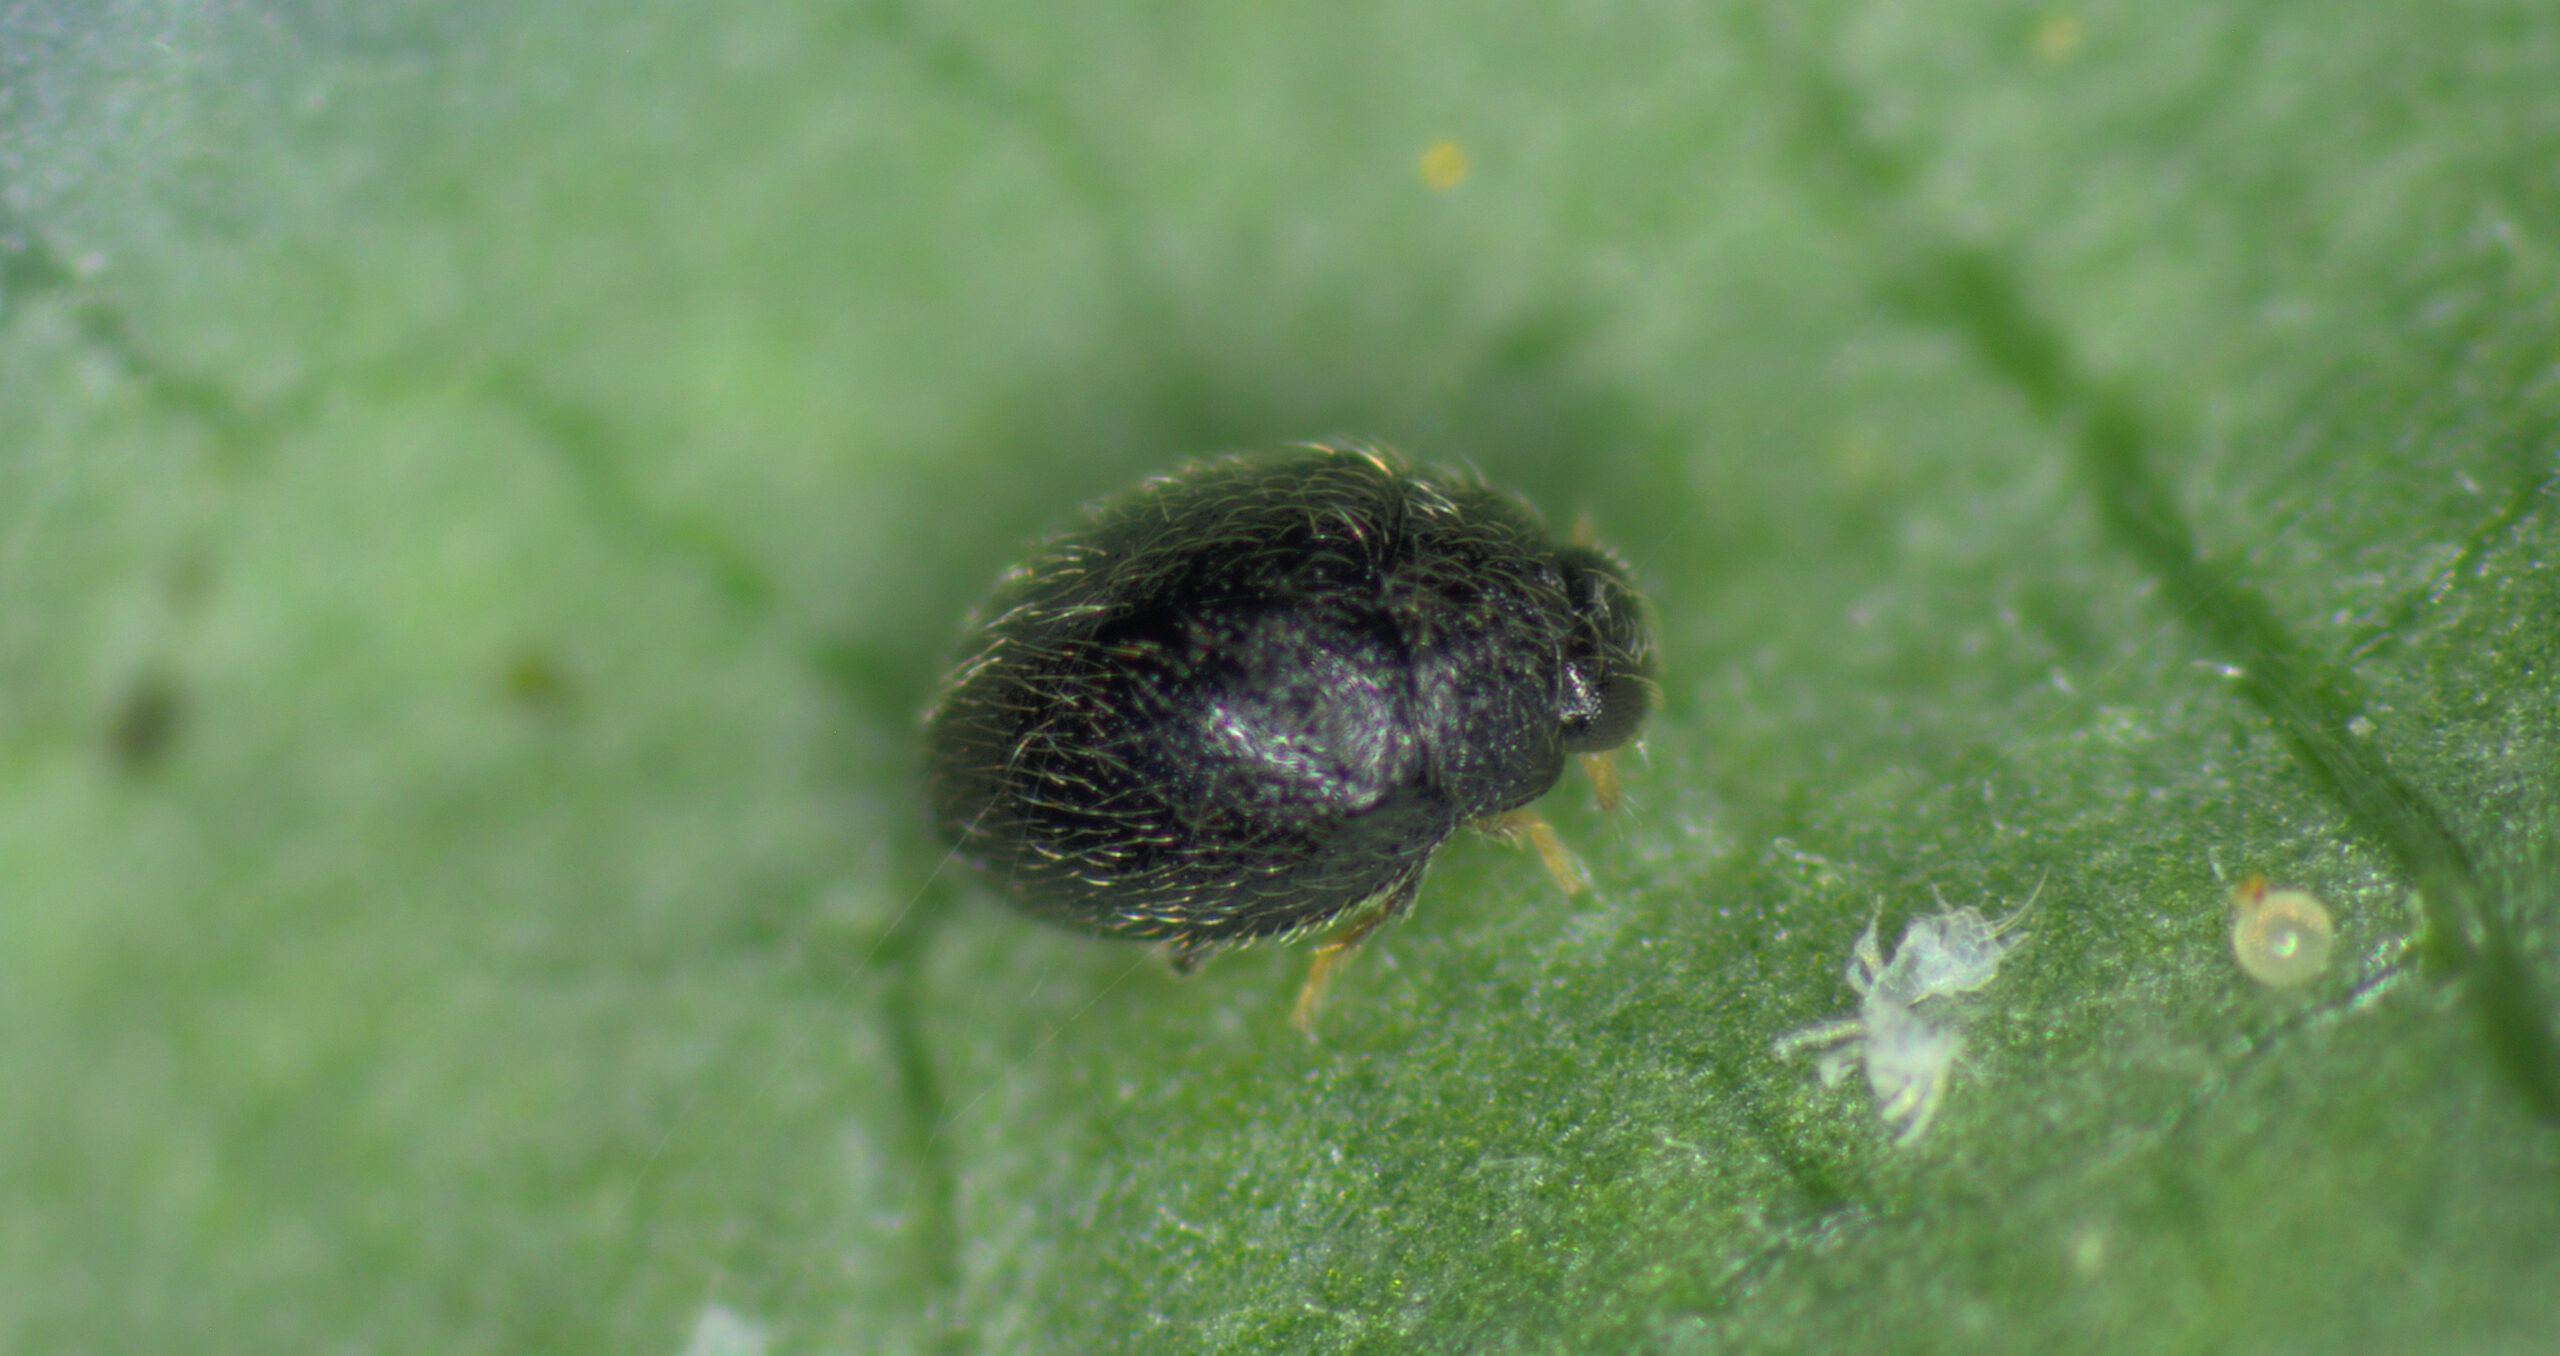
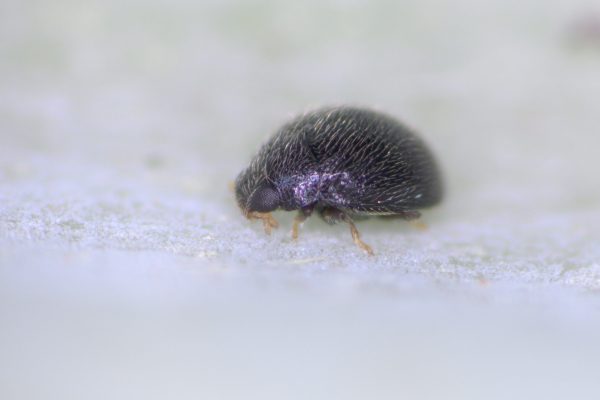
The small, shiny, black mite-eating ladybird beetle or Stethorus is one of the most important predators of spider mites in bananas. Three species of Stethorus occur in bananas, but the main species is Stethorus fenestralis. All three species appear identical to the naked eye and all species are specialist spider mite predators.

Stethorus numbers increase following mite flares, as mites provide ample food supplies that allow Stethorus’ populations to flourish and eventually bring the mite levels back under control. Stethorus are high-density predators, meaning they are attracted to mite hotspots.  Interestingly, both adult and larval Stethorus beetles primarily feed on mites, making them very effective predators against these pests.

Stethorus adult 2
Adult Stethorus beetle

The life cycle of Stethorus

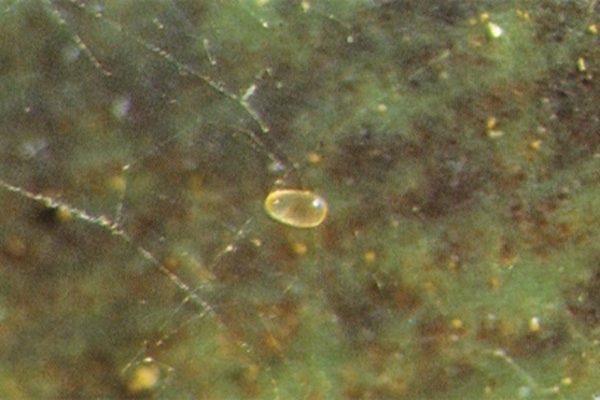
There are four distinct stages in the life cycle of Stethorus and it is important to recognise each of these stages. The elongated, translucent to pale brown eggs are laid singly under the leaves, either on or close to the mite colonies. The eggs are about 0.2 mm long and can easily be distinguished from the smaller spherical (and usually more numerous) mite eggs. Mite eggs are not visible to the naked eye, and a hand lens would be necessary to view them in the field.

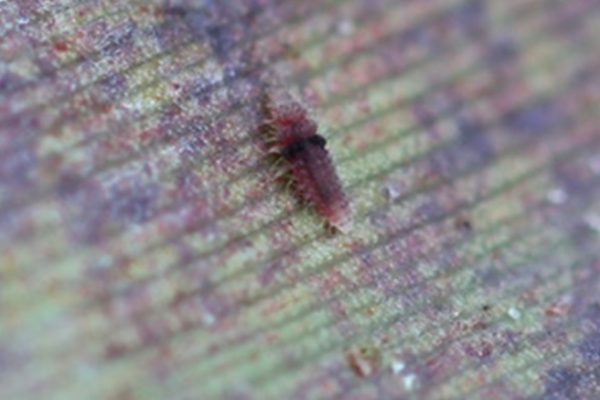
Larvae are hairy and vary in colour depending on their age. Larvae go through four stages of maturation, each separated by a moult. Young larvae are pale cream becoming dark grey at maturity. Fourth-stage larvae eventually stop feeding when they are about 2 mm long and attach themselves to the leaf where they pupate.

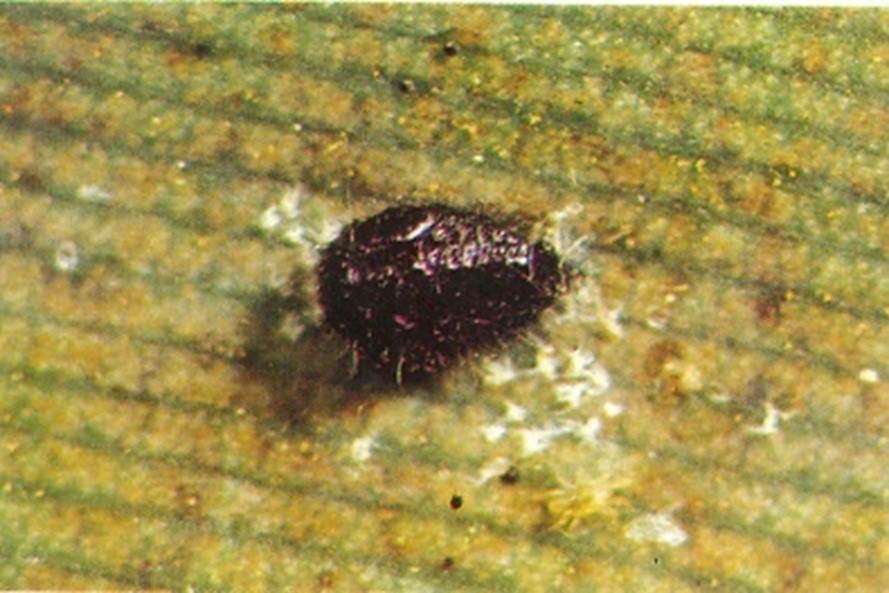
The pupae are black, hairy and about 1 mm long. Pupae may be found anywhere on the underside of the leaf; however, they tend mostly to be found close to or on the midrib. The pupal stage is easily seen on a leaf, as a skin remains after the adult emerges. To determine whether a pupa is alive or is simply an empty pupal skin, smear it gently with a finger. A wet streak will indicate it was alive and if no wet streak is produced it, was an empty skin.

Adults are shiny black, almost circular beetle and are about 1 mm long. They also occur on the underside of the leaf. Where there is a high incidence of mite infestation, there may be more than fifty adults under one leaf, although there are usually less than ten when mite populations are in check.

Looking after your Stethorus population

Broad spectrum insecticides are a major cause of mite flares because they destroy beneficial predators like Stethorus. Avoid using these chemicals (e.g. products containing bifenthrin) to control mites. Check your leaves to see if you have Stethorus present and get a gauge on the population levels. Although research specifically in bananas hasn’t yet been undertaken to determine how many Stethorus need to be present to control spider mites, they can keep spider mite populations in check when spider mite pressure is low.

Stethorus egg
Stethorus egg
Stethorus larva
Stethorus larva
Stethorus pupa
Stethorus adult
Stethorus adult

Californicus

Some predatory mites are commercially available for purchase to apply in the field. The more common predatory mite species Neoseiulus californicus (‘Californicus’) is described as an ‘aggressive and robust mite’.

Californicus mites are less than 1mm long and are pear-shaped. Their colouring is dependent on diet but can be clear to pink or orange. Eggs are clear to white, oval-shaped and similar to that of the eggs of the two-spotted spider mite, but distinctively larger. Females can lay up to 4 eggs per day, eggs tend to be laid on the underside of the leaves along veins or on leaf hairs.

 Adult Californicus can consume up to 5 adult spider mites daily and can live for up to 20 days. These beneficial insects can even flourish even when prey is scarce, as they are also able to consume alternate food sources such as pollen or other small insects. However, research has shown that reproduction and developmental rates are increased when Californicus exclusively feed on spider mites.

Californicus is known for its resilience to differing environmental conditions. They remain active in both warm and cool temperatures and can survive well in both high and low humidity better than most other predatory mites. However, their optimal conditions are between 16-32˚ C with a relative humidity range of 40-80%. In optimal conditions (30˚ C), their lifecycles can be as fast as 4 days, almost twice as fast as that of their prey. Californicus are also less sensitive to pesticide residues which enables faster re-establishment after chemical applications.

The use of predatory mites as a biological control for spider mites has been trialled on commercial banana farms in Far North Queensland. Some growers release the predatory mites monthly as a preventative treatment for mite flares. For more details on how to release, and release rates see Bugs for Bugs’ instructions here or Natural Solutions’ instructions here.

For more information contact:

The Better Bananas team
Department of Agriculture and Fisheries
South Johnstone
Email betterbananas@daf.qld.gov.au 

 
This information is adapted from: Pinese, B., Piper. R 1994, Bananas insect and mite management, Department of Primary Industries, Queensland 
This information has been prepared as part of the National Banana Development and Extension Program (BA19004) which is funded by Hort Innovation, using the banana industry research and development levies and contributions from the Australian Government. Hort Innovation is the grower-owned, not-for-profit research and development corporation for Australian horticulture. The Queensland Government has also co-funded the project through the Department of Agriculture and Fisheries.

Spider mites – life cycle and behaviour

Spider mites

Life cycle and behaviour

Both the banana spider mite (Tetranychus lambi) and the two-spotted mite (Tetranychus urticae) are often simply referred to as ‘spider mites’. Both are common pests of a broad range of crops and are widely distributed.

The life cycle and appearance of the banana spider mite and the two-spotted mite are similar. Both mites are typically found on the underside of leaves, only being present on the top side in very high infestations. The main distinguishing feature between the two types of mites is that high populations of the two-spotted mite are always associated with webbing (similar to spiders), while this is absent in infestations of the banana spider mite. Webbing occurs near mite colonies, typically on the underside of the midrib or in severe infestations, down the leaf veins. The two-spotted mite is more commonly found on bananas in South-East Queensland and northern NSW. By comparison, the banana spider mite predominantly is in Far North Queensland and is also identifiable as it is more straw coloured and lacks spots.

The life cycle of the mite (red arrows indicate parts of the plant affected)

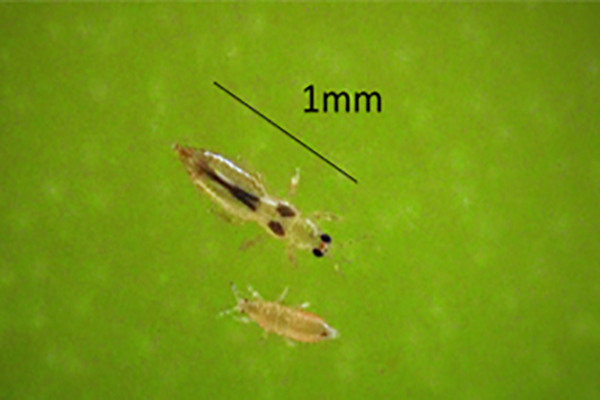
The straw-coloured or greenish adult banana spider mites are usually less than 0.5mm in length and are best seen with the aid of a magnified (10X) hand lens. Under good light, the eight-legged adults have a spider-like appearance that can just be made out with the naked eye.

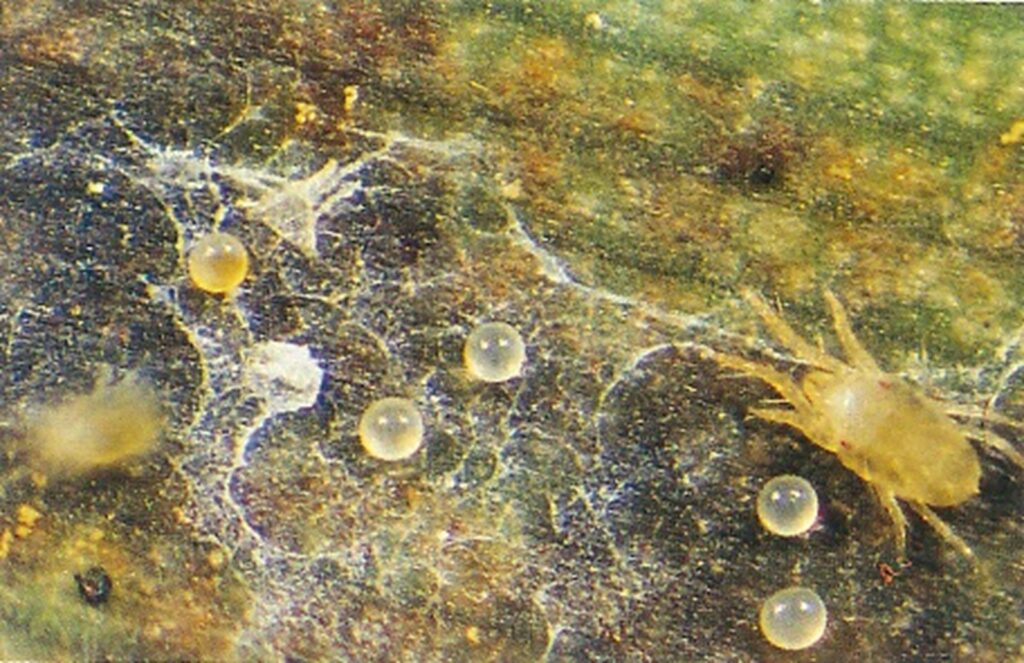
The very small transparent to yellow, spherical eggs are laid singly on the leaf surface and, upon hatching, pass through two nymphal stages before becoming adults. In hot conditions, the life cycle can be as short as seven to ten days.

Adult spider mite with eggs
Adult spider mite and its spherical eggs. Note the dark leaf tissue, an indication of dead leaf cells caused by mite feeding

By comparison, the adult female of the two-spotted mite (T. urticae) lives two to four weeks and can lay several hundred eggs during her life.1 Their quick life cycle and the ability of females to produce many eggs, can mean populations build rapidly if conditions are favourable.

Spider mites mainly use wind and small spun lines of web to migrate. The two-spotted mite is known to travel in winds as low as 8 km/h but prefers stronger winds.2 Mites also have the ability to move by walking on or short distances between plants2. Spider mites can migrate at any time, tending to move on when their populations become high, predators become abundant or the quality of food sources declines.

References

  1. Florida Department of Agriculture and Consumer Services, Division of Plant Industry 2009, University of Florida, viewed 17 January 2022, https://entnemdept.ufl.edu/creatures/orn/twospotted_mite.htm#top
  2. Seeman, O, Beard, J 2005, National Diagnostic Standards for Tetranychus Spider Mites, Plant Health Australia, Canberra

For more information contact:

The Better Bananas team
Department of Agriculture and Fisheries
South Johnstone
Email betterbananas@daf.qld.gov.au 

 
This information is adapted from: Pinese, B., Piper. R 1994, Bananas insect and mite management, Department of Primary Industries, Queensland 
This information has been prepared as part of the National Banana Development and Extension Program (BA19004) which is funded by Hort Innovation, using the banana industry research and development levies and contributions from the Australian Government. Hort Innovation is the grower-owned, not-for-profit research and development corporation for Australian horticulture. The Queensland Government has also co-funded the project through the Department of Agriculture and Fisheries.
Mite predators and monitoring

Encouraging spider mite predators

Promoting predatory insects to manage mite levels is best done by limiting the use of harmful chemicals, such as broad-spectrum insecticides and miticides, which affect beneficial predatory mites and Stethorus

Stethorus, the shiny black pinhead-sized lady beetles, are naturally occurring mite predators. They tend to increase in number when spider mite populations are high, as they utilise spider mites as a food source to survive. However, there may be a delay in their population growth due to the initial lack of spider mites.

Stethorus adult 2
Adult Stethorus beetle

Predatory mites such as Neoseiulus californicus (Californicus) and Phytoseilus persimilis (Persimilis) can also be purchased for release in your blocks from biological agent suppliers. It has been found that Persimilis may be the more efficient predator in south-eastern Queensland and northern NSW, as it utilises the webbing of the two-spotted spider mite, to locate its prey. While, in Far North Queensland, it’s advised to use the predatory mite Califonicus due to its suitability to the climatic conditions and its effectiveness against the predominant predatory mite, the banana spider mite.

Click here to read more about predators and other beneficial insects

Monitoring mite populations

Mites have a short life cycle which can be as short as 7-10 days during hot-dry conditions and as long as 4 weeks. Over summer months, weekly monitoring is preferable, however, fortnightly is sufficient during cooler, wet conditions. To monitor for the presence of mites, check plants for overall mite damage. The following categories can be used as a guide for the assessment of damage on the underside of leaves.

1 = Low


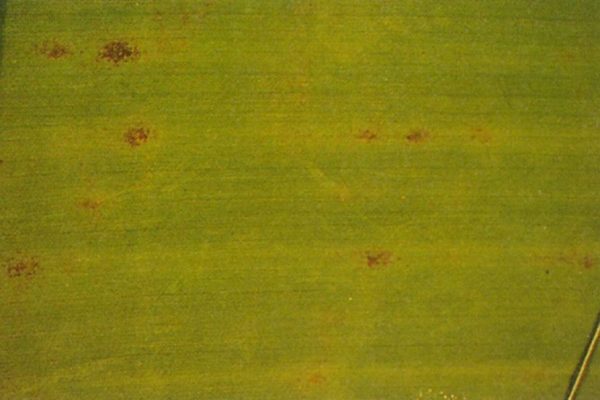
A few mite colonies on leaves and minor (more than one or two) localised bronzing on the under surface of leaves

Monitoring mite populations low mite levels

2 = Moderate


Mite colonies are scattered but numerous; bronzing is clearly evident on leaves (patchy but starting to coalesce) but the damage is contained within the interveinal areas.

Monitoring mite populations moderate mite levels

3 = High


Mite colonies coalescing and bronzing damage over most of the leaves.


Monitoring mite populations high mite levels

Applying miticides may be unnecessary if you have low to moderate levels (categories 1 or 2) of spider mite damage and healthy predator populations. To understand mite populations, a X10 magnifying glass is needed to observe all stages of mites (including eggs, nymphs and adults). A healthy predator population may look like finding predatory eggs and nymphs near the mite colonies. This may include finding small black Stethorus beetles. Stethorus are found mainly on the underside of leaves, with their pupae found close to the mid-rib. The presence or absence of mite predators can help you determine the best management strategy moving forward.

Predatory adult Stethorus
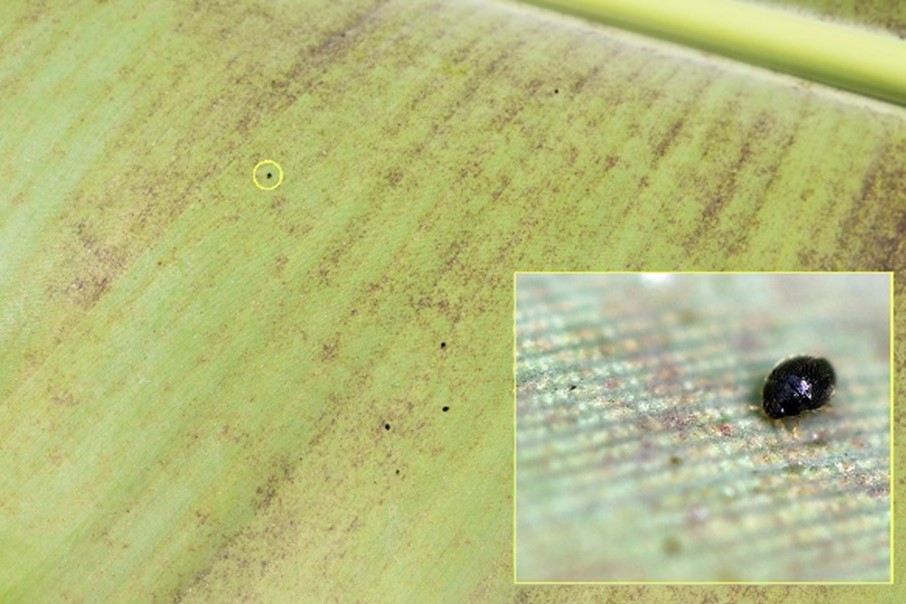
Predatory adult Stethorus beetles on a banana leaf

If healthy predator populations are detected then your consultant may advise continued weekly monitoring. You may also consider boosting the number of natural predators by releasing the predatory mite Californicus as a hot-spot treatment if only certain parts of the paddock are having mite flares.

High level mites present
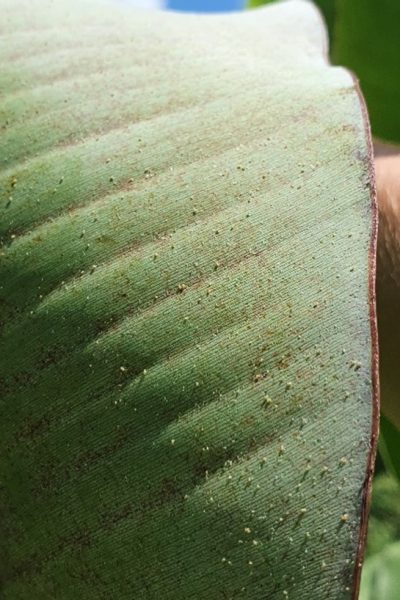
Mites on the underside of banana leaf, adults visible to the naked eye

In addition to an overall damage assessment, it is also important to take note of the youngest leaf the mites are present on. In general, mites will move up the plant to the younger leaves, particularly as the population grows. By monitoring the movement of mites, decisions about the implementation of control practices to reduce or prevent the severity of irreversible damage to new leaves can be made. In general, the greater the number of mites and the younger the leaves they attack, the more severe the infestation.

It’s important to monitor regularly as spider mite populations can increase rapidly under favourable weather conditions (hot and dry). Therefore, always consider weather conditions before making management decisions. Rain and wet weather will help to keep spider mite populations down. If population levels are high, one rain event may not be enough to reduce spider mite populations sufficiently.

If you have high levels of damage (category 3) and spider mites are present on newly emerged leaves then a miticide treatment will be required to gain control of the population. Click here to view the chemical information below and talk to your consultant for specifics.

For more information contact

The Better Bananas team
Department of Agriculture and Fisheries
South Johnstone
Email betterbananas@daf.qld.gov.au 

 
This information is adapted from: Pinese, B., Piper. R 1994, Bananas insect and mite management, Department of Primary Industries, Queensland 
This information has been prepared as part of the National Banana Development and Extension Program (BA19004) which is funded by Hort Innovation, using the banana industry research and development levies and contributions from the Australian Government. Hort Innovation is the grower-owned, not-for-profit research and development corporation for Australian horticulture. The Queensland Government has also co-funded the project through the Department of Agriculture and Fisheries.
Managing spider mites

Managing spider mites

Causes of mite flares

Broad spectrum insecticides (pesticides), such as bifenthrin, are one of the major causes of mite flares because they remove the beneficial predators that are providing background pest control. The use of such chemicals is not recommended.

Other factors likely to increase the potential for a mite problem include:

Causes of mite flares
Other factors likely to increase the potential of a mite flare

Management options

Avoiding the situations mentioned above will greatly contribute to managing spider mite populations. Click on the links below to read more on other activities that will assist include: 

For more information contact

The Better Bananas team
Department of Agriculture and Fisheries
South Johnstone
Email betterbananas@daf.qld.gov.au 

This information has been prepared as part of the National Banana Development and Extension Program (BA19004) which is funded by Hort Innovation, using the banana industry research and development levies and contributions from the Australian Government. Hort Innovation is the grower-owned, not-for-profit research and development corporation for Australian horticulture. The Queensland Government has also co-funded the project through the Department of Agriculture and Fisheries.
Grower case study – protecting crowns improves fruit quality for Sellars Bananas

Protecting crowns improves fruit quality for Sellars Bananas

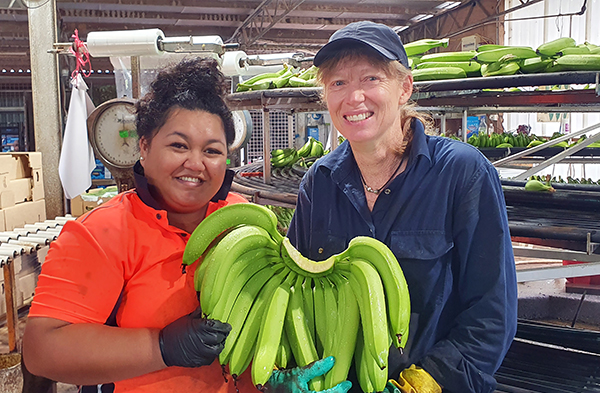
Anne Rikini and Naomi Brownrigg of Sellars Bananas. Naomi is happy with the results of using a post-harvest fungicide for controlling CER.

Sellars Bananas are renowned for producing premium quality bananas. However, frustratingly, even when supplying the best quality fruit at the farm gate, fungal organisms can wreak havoc with consignments down the supply chain. This has been the recent experience of Sellars Bananas and feedback from market agents is, they are not alone.

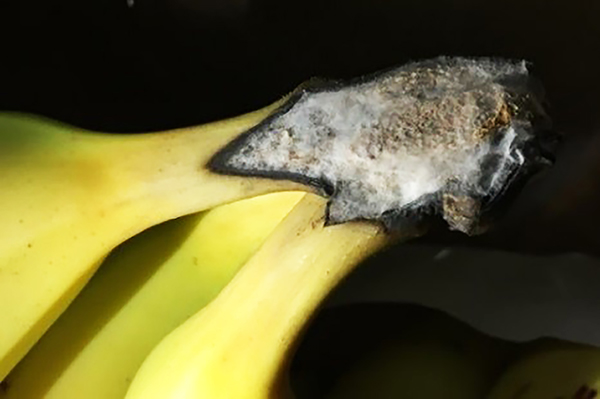
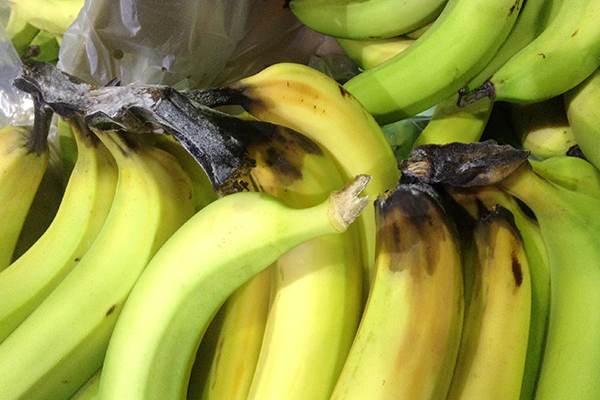
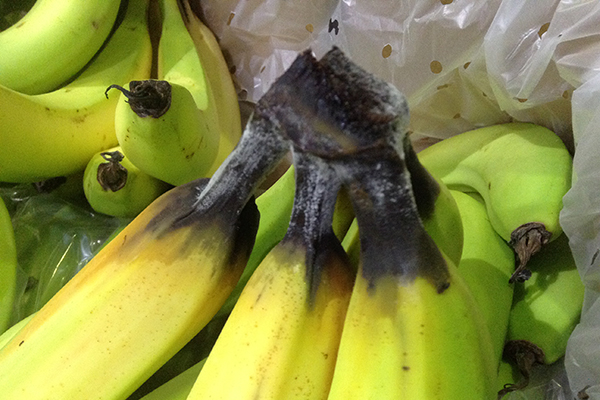
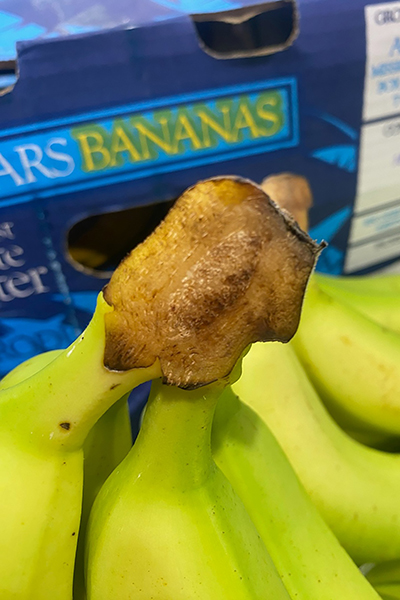
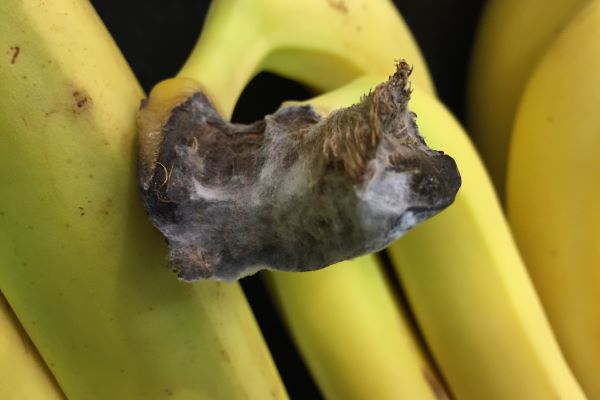
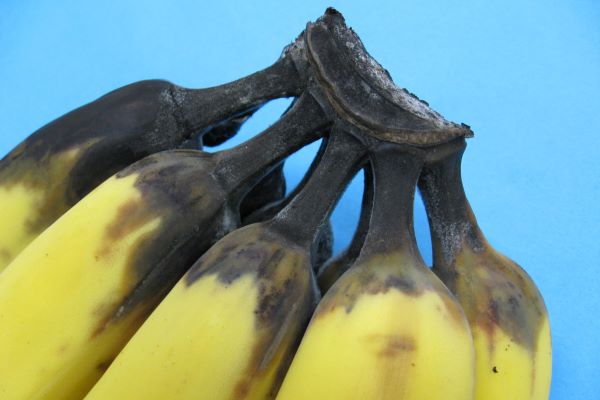
Crown end rot (CER) is caused by several fungal species and symptoms develop on the cut surface of the crown. Symptoms can differ in terms of severity depending on the causal fungal organisms present. Less severe damage includes superficial white/fluffy fungal growth on the cut surface. These symptoms rarely progress into the fingers of the fruit or affect eating quality (Figure 1). However, the more severe form of CER, commonly known as Chalara results in a black rot that extends from the crown into the fruit stalk and into the fingers, severely impacting fruit quality (Figure 2).

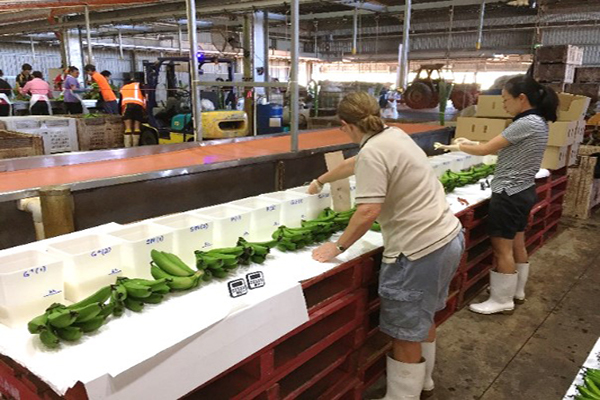
Feedback from the market is that CER continues to be a problem and symptoms start to develop as the fruit is ripened. It is hard to pick up before fruit is sent to retailers as not all cartons may be affected, and it may only impact one or two clusters across several cartons in a consignment. The good news is, there are post-harvest fungicides registered for use in bananas that can control CER.

Naomi Brownrigg from Sellars Bananas shares their experience with the problem and what they have put into place to manage it.

Figure 1: CER symptoms showing superficial white/fluffy fungal growth on the cut surface. This rarely extends into the fingers or affects the eating quality.

Chalara, a recent issue for Sellars Bananas

The symptom of superficial fungal growth on the cut surface of crowns has always been a minor problem from time to time for Sellars Bananas, predominately in the summer months. Naomi became more concerned when she started to see symptoms of Chalara approximately 3 years ago, causing more significant damage to fruit quality. ‘We never thought we had to treat it until Chalara started to turn up. At first, it was just now and then in the winter months, and then it started to appear most weeks of the year over a period of 2 years,’ Naomi said. ‘If you have never seen Chalara, it’s like CER on steroids. It will quickly rot the fruit from the crown down once the ripening process begins. Not all cartons are affected, it may be only one or two boxes or some clusters in a single box.’

Good shed hygiene and the use of chlorine didn't fix the issue

Before implementing the post-harvest spray system, Sellars Bananas tried different practices to resolve the issue. ‘Initially, we tried sanitising the shed and used a high-pressure cleaner in all of the wet areas. Although it’s a good practice, it didn’t work,’ Naomi said. ‘We then tried an inline chlorinator that used chlorine tables, that also didn’t work. Finally, at the congress last year, I spoke to Kathy Grice and David East from the Department of Agriculture and Fisheries on the issue and they were pretty clear that the only way to control it was with a post-harvest spray. So, we set about implementing a post-harvest fungicide spray, using prochloraz that treats all the fruit on the wheel.’

The packing wheel required some family ingenuity

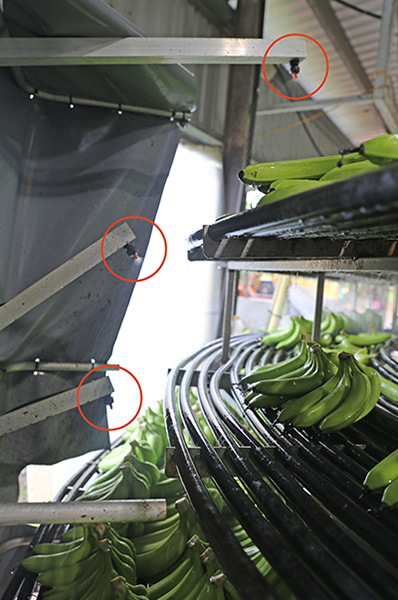
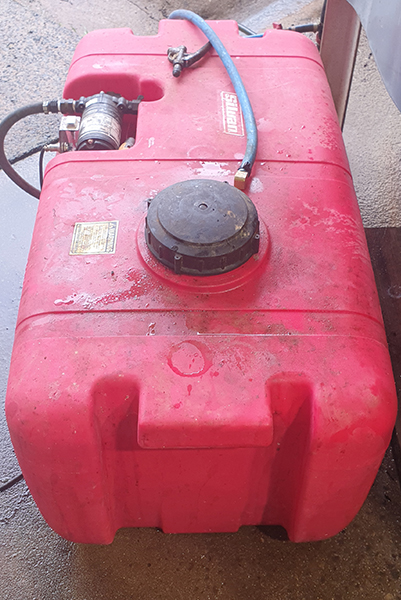
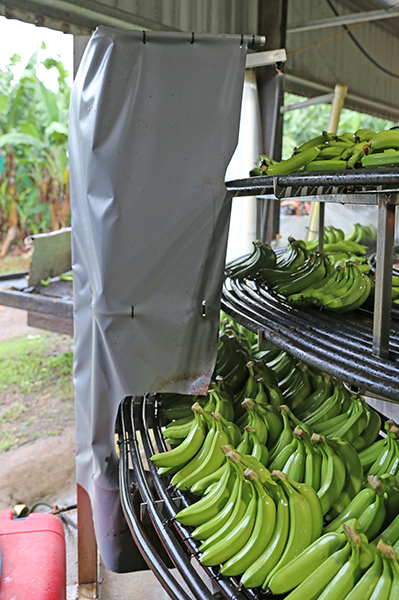
Naomi enlisted the expertise of her brother-in-law Mark Nissen to come up with a spray system that would work for their 3-tier banana wheel (Figure 3). Once they had designed the frame at the right height and angles, Mark welded the steel frame together. The next step was attaching the spray system. ‘We set up a spray rig with three nozzles, one for each tier on the wheel, and attached a 200 L Silvan tank to it with a spray unit (Figure 4),’ Naomi said. ‘The spray unit puts out 7 L/min and each nozzle puts out 300 mL/min. The pressure is regulated, and any excess chemical solution is returned to the tank.’ As per the label instructions we do not catch any of the solution from underneath the wheel once it has been sprayed on the fruit. We use the product Protak® and the label rate is 110 mL/200 L. For our operation, this means we are using 250 mL of Protak® each day.’

Tips for placement of spray booths:

  • Spray booth should be placed after the fruit wash.
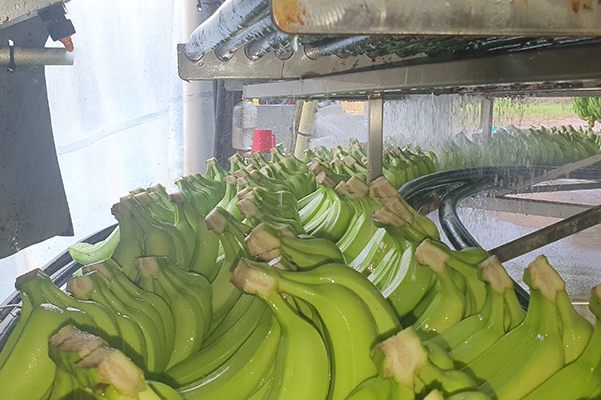
  • Position spray nozzles and clusters to ensure the crown surface is sprayed (Figure 5).
  • Set the speed of the wheel or belt (trough systems) to allow a 30-second spray.
  • Position the spray booth at the furthest point possible away from packers and use spray shields to minimise spray mist (Figure 6).
  • Place spray booths in a well-ventilated area.

Have a trough instead of a wheel?
Many packing sheds have installed post-fungicide spray booths, spraying crowns after they leave the trough and before reaching packers.

Figure 5: Clusters are placed upwards on the wheel to ensure cut surface of crowns are treated.

Implementation didn't require changes to existing practices

No changes were required in terms of Sellar’s packing procedures. ‘We were already placing the fruit with the crowns up,’ Naomi said. ‘There seems to be no mist from the spray, as there is a protective shroud around the spray unit (Figure 6). We are using Protak®, so there is no smell, and our packers all wear gloves.’

The benefits outweigh the cost

All up the cost of the spray unit itself excluding labour, was approximately $2000. This includes the tank, pump, inverter, hoses, nozzles, connections etc. and steel for the frame. The only ongoing costs apart from electricity costs for the pump, is the chemical itself. ‘We average one litre of Protak per week and current pricing is $170/L,’ Naomi said. 

Although Chalara was the main reason for Sellars to implement a post-harvest spray, they believe the benefits have been substantial when it comes to overall fruit quality. ‘The difference it makes to the appearance of the crowns at the market is huge, you can store the fruit for longer knowing that the crowns are going to hold up which gives them options as to when the fruit gets sold,’ Naomi said. ‘You may think this is a bad thing, but if the crowns are not holding up, that fruit needs to be sold ASAP, sometimes at a discount. I have been told that buyers of our fruit are very happy with the results. I wish we had implemented it (spray system) years ago.’

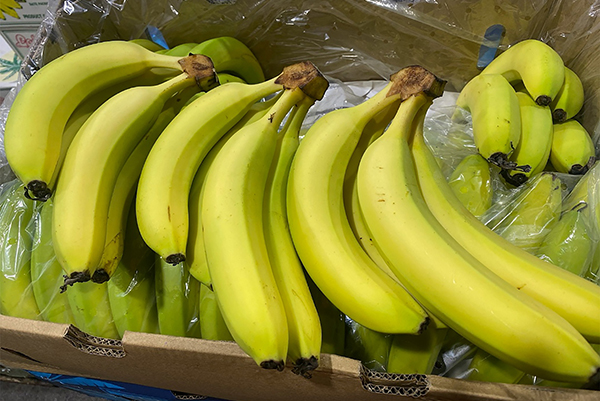
Sellars’ market agent is also happy with the results and now sends Naomi photos of clean crowns since they have installed the post-harvest fungicide spray (Figures 7 & 8). 

If you would like more information on this case study or managing CER in bananas contact  DAF’s Banana Extension Team via email betterbananas@daf.qld.gov.au.

Figure 6: Protective shroud around booth minimises spray mist.
Figure 7: Sellars fruit showing clean crowns 11 days after post-harvest fungicide treatment.
Figure 8: Sellars fruit showing clean crowns 11 days after post-harvest fungicide treatment.

Thank you

Thank you to Naomi Brownrigg and the team at Sellars Bananas who provided their time and gave permission to use this case study for the benefit of the wider industry.

The application of post-harvest fungicides is the most effective management strategy.

Research led by Kathy Grice from the Department of Agriculture and Fisheries (DAF) has shown that post-harvest fungicide application is the most effective management strategy. At the time of publication products containing thiabendazole (e.g. Tecto®) and prochloraz (e.g. Protak®) are registered for post-harvest use in bananas.  Important screening work undertaken by DAF has shown that some of the organisms that cause CER are less sensitive to thiabendazole-based products, particularly in the coastal regions of Far North Queensland. These organisms remain more sensitive to products containing prochloraz.

The application method is different depending on what product you use.

Products containing thiabendazole (e.g. Tecto®) are registered for use as a dip. Whereas products containing prochloraz (e.g. Protak®) are registered for use as a non-recirculating spray system only.

Always check the APVMA website for the registration status of products before use and follow label directions.

More information

This case study has been produced as part of project BA19004 the National Banana Development and Extension Program which is funded by Hort Innovation, using the banana industry research and development levies, co-investment from the Department of Agriculture and Fisheries and contributions from the Australian Government. Hort Innovation is the grower-owned, not-for-profit research and development corporation for Australian horticulture.

A guide to identifying banana fruit fungal issues.

A guide to identifying banana fruit fungal issues.

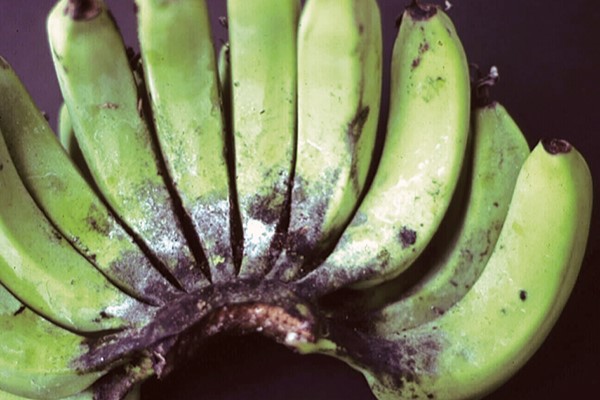
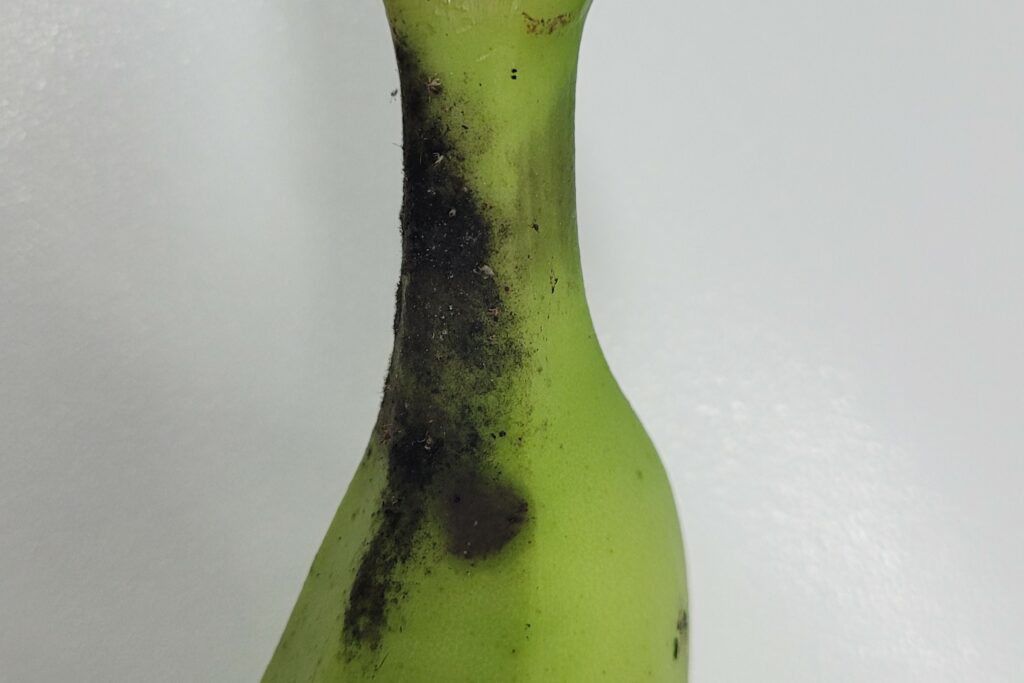
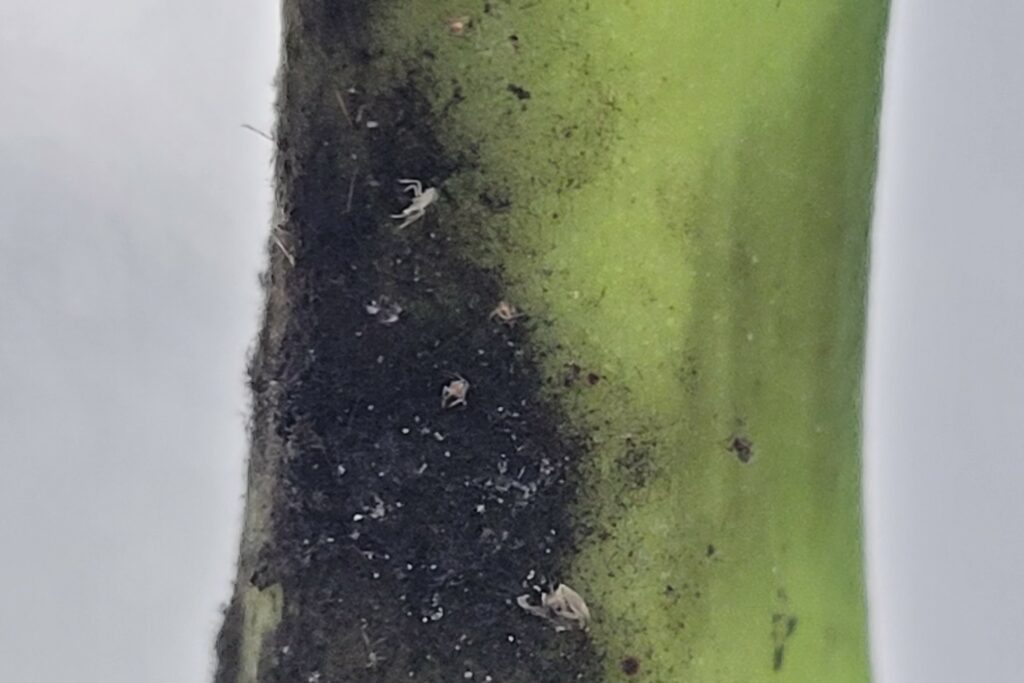
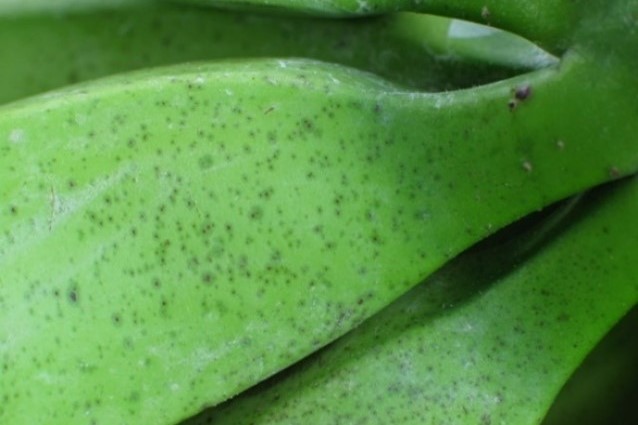
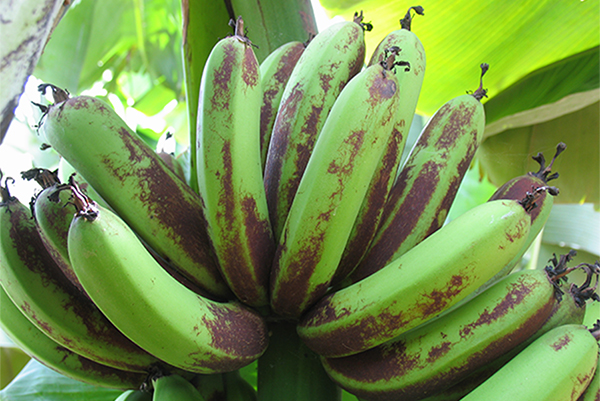
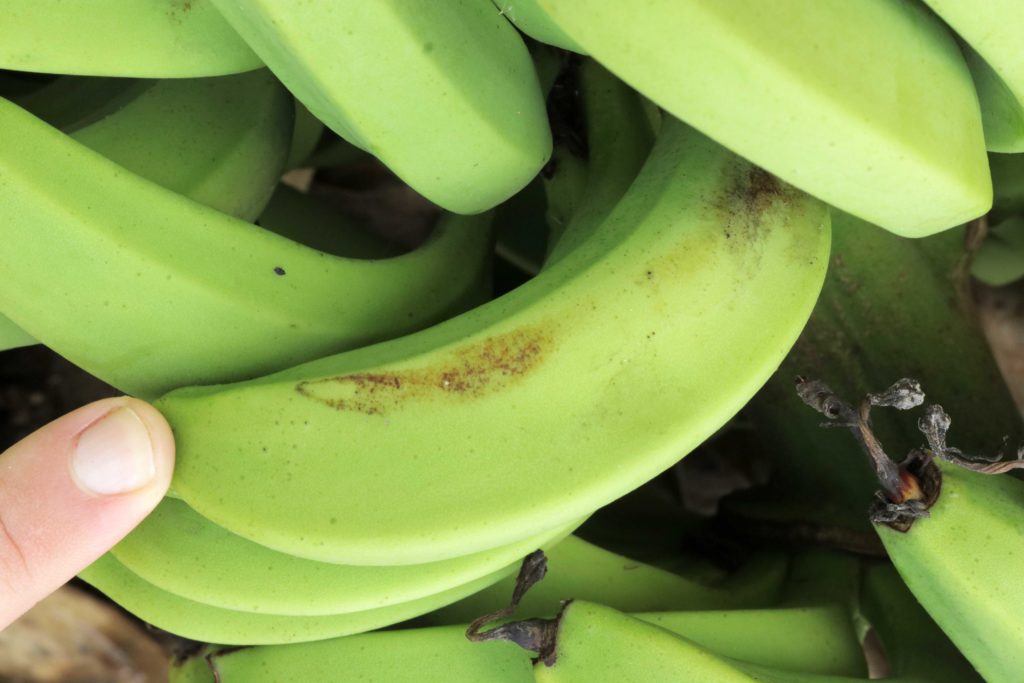
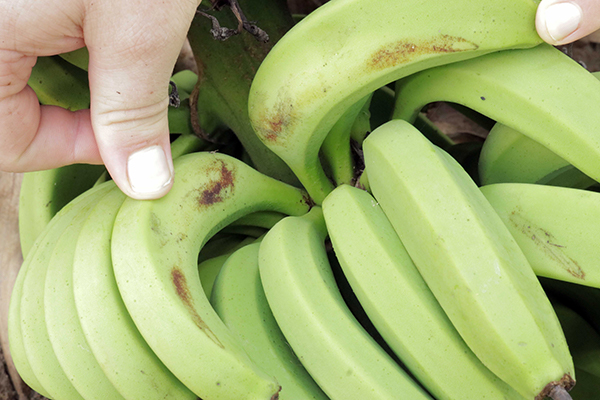
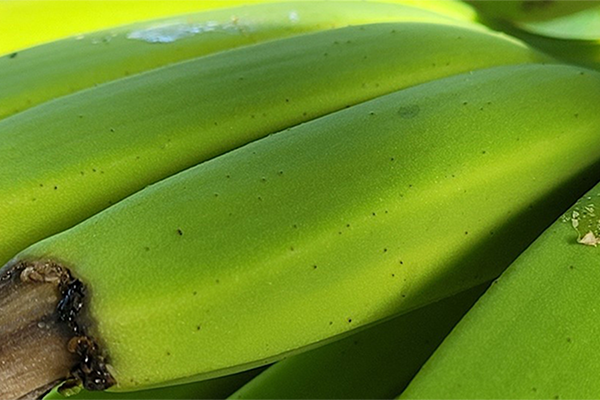
Bananas are susceptible to various fungal diseases that can affect their fruit quality. Correctly identifying these fungal issues in banana fruit is crucial to understanding how to manage and prevent further damage. This guide explores some of the most common fungal problems that affect banana fruit.

If your issue isn’t listed here or you are having problems identifying what is causing damage to your crop check out the Better Banana’s problem solver section here

Sooty blotch

Sooty mould

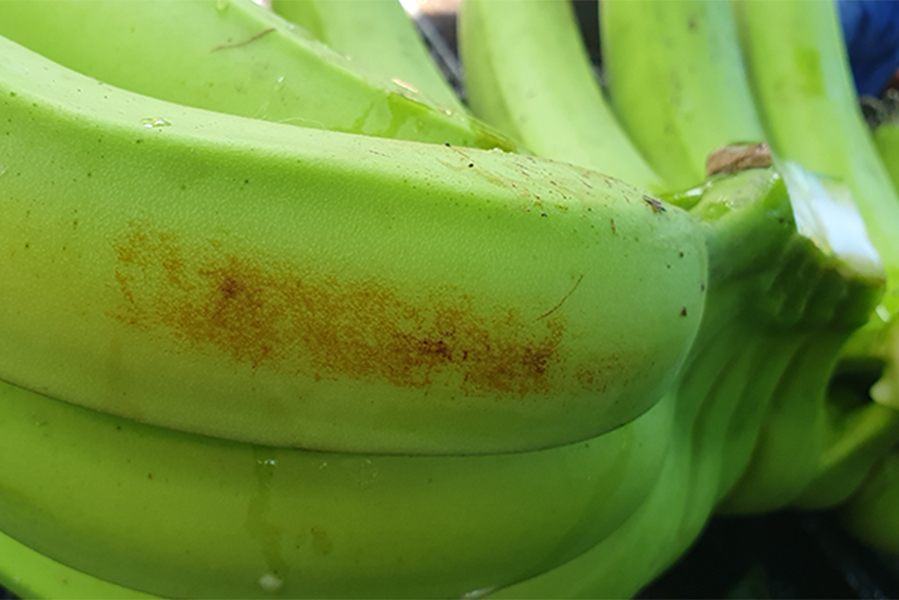
Fruit speckle

Deightoniella spot

This information has been developed as part of the National Banana Development and Extension Program (BA19004) which is funded by Hort Innovation, using the banana industry research and development levies and contributions from the Australian Government. Hort Innovation is the grower-owned, not-for-profit research and development corporation for Australian horticulture. The Queensland Government has also co-funded the project through the Department of Agriculture and Fisheries.
Yellow Sigatoka (leaf spot) General information

Yellow Sigatoka (leaf spot) Pseudocercospora musae

What is yellow Sigatoka and where does it occur?

Yellow Sigatoka is a fungal disease in bananas that causes leaf lesions and is commonly referred to as leaf spot. The fungal plant pathogen that causes the disease is Pseudocercospora musae.

Yellow Sigatoka occurs in all growing regions of Australia and is common in Far North Queensland, particularly during the wet season when conditions are warm and moist.

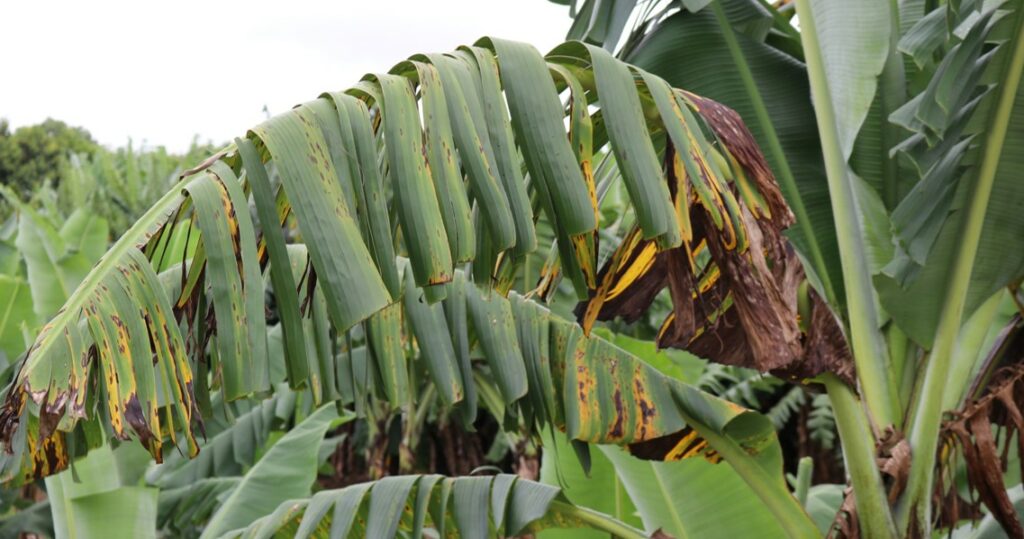
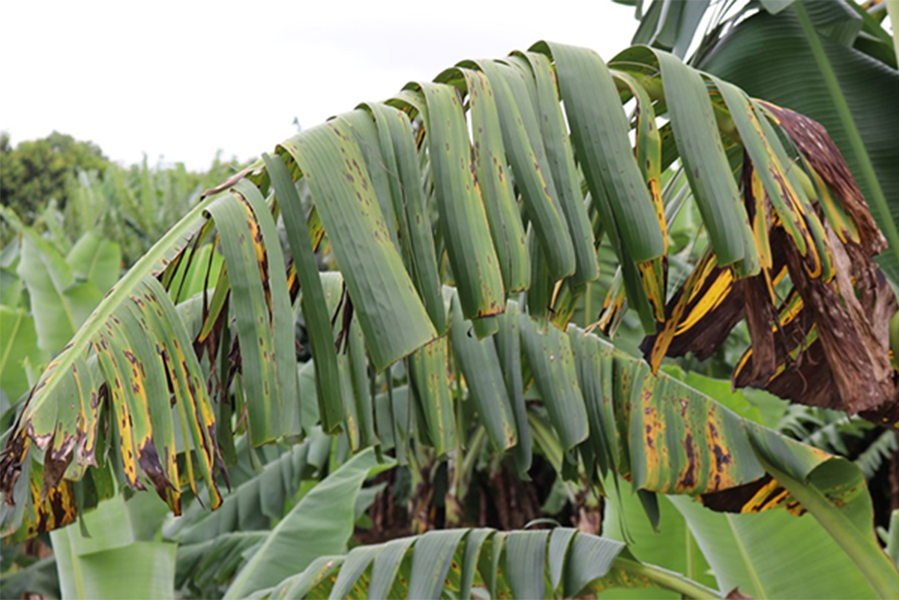
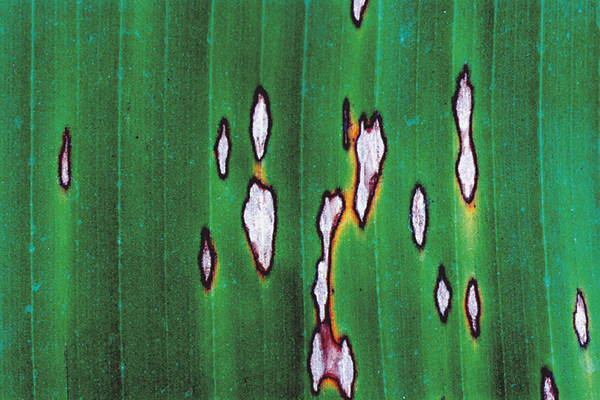
Figure 1 Advanced symptoms of yellow Sigatoka disease. It is important to remove leaves with visible spot prior to fungicide application, to reduce disease load and to ensure the longevity of fungicides used for management.

How does yellow Sigatoka impact banana production?

The lesions caused by the disease result in premature leaf death and reduces the plant’s ability to photosynthesize, impacting bunch size and delaying bunch filling. It also reduces the green life of fruit, causing mixed ripening which can restrict market access. 

If left uncontrolled or unmanaged (Figure 1), costs of deleafing and spraying increase and it can be difficult to identify other exotic leaf diseases such as black Sigatoka.

How does yellow Sigatoka spread?

The disease produces two types of spores, ascospores and conidia that spread by two main vectors, air and water.

Air movement within banana paddocks allows for easy dispersion of fungal spores (ascospores), allowing them to settle and infect new plants. These spores are most active in the wet season due to warm and moist conditions, causing tip spotting in younger leaves. Ascospores are responsible for the long distance spread of the disease due to dispersing in air currents.

Movement by water, such as rainfall or dew, moves conidia from higher leaves down the plant and onto suckers and causes line spotting on the leaf. Conidia infect new leaves of the same plant or neighbouring plants if the rain is wind driven.

What are the stages of yellow Sigatoka

Symptom development of yellow Sigatoka is broken up into five stages (Figure 2).

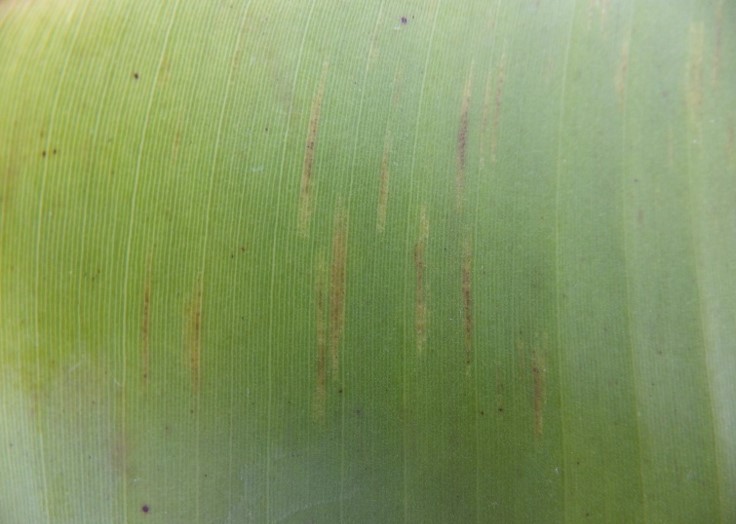
Stage 1: Yellowish green specks less than 1mm long. Generally, younger leaves are affected. Very hard to see with the naked eye.
Stage 2a: Specks develop into yellow streaks 3 to 4 mm long.
Stage 2b: Streaks darken to a rusty brown.
Stage 3: Streaks broaden to a spot, becoming wider with undefined margins.
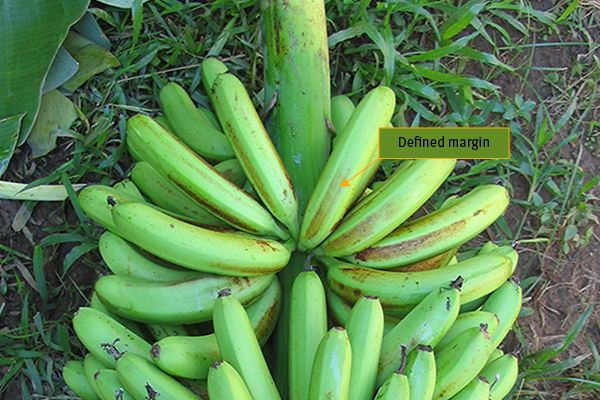
Stage 4: Spots develop defined dark brown edges, the centre becomes sunken and occasionally has a yellow halo. Conidia are produced on stage 4 lesions. 
Stage 5: Sunken centre turns grey and is surrounded by dark brown/black border. Ascospores are produced on stage 5 lesions. 

Figure 2 Five stages of yellow Sigatoka symptom development.

How is yellow Sigatoka managed?

Yellow Sigatoka can be difficult to control in wet, moist conditions and should be managed with a combination of cultural and chemical controls.

Deleafing (Figure 3) is a major component of managing yellow Sigatoka that cannot be overlooked. Increased chemical application is unable to compensate for regular deleafing practices.

What cultural controls should I practice?

Controlling yellow Sigatoka is best managed through cultural control practices. Although labour intensive, they are necessary to keep fungal levels low within a canopy, especially during periods of high rainfall when the ability to aerial spray or mist is limited. 

Figure 3 Regular deleafing is critical for yellow Sigatoka control.

Deleafing is the most critical control method for managing yellow Sigatoka.

  • Deleafing removes infected leaves from the canopy and assists in keeping disease inoculum levels low. Deleafing is recommended once a single leaf on a plant has leaf spot lesions on more than 5% of the total leaf surface.

  • To prevent yellow Sigatoka infections, some growers practice intensive deleafing practices. This involves removing additional leaves, that are not yet showing visible signs of the disease, as the early stages can be difficult to detect with the naked eye. Bunched plants are an exception, as most growers only remove the minimum number of leaves. Tipping, which is only cutting out a proportion of the leaf with visible symptoms, is not recommended as the entire leaf would be infected.

  • Deleaf before spraying, as once yellow Sigatoka produces visible lesions (stage 3 onwards) neither systemic nor protectant fungicide applications are effective against those spots. Deleafing also assists in reducing the risk of fungicide resistance on your farm, and neighbouring farms.

  • Recent research suggests that the best deleafing practice is to go through frequently before the wet season to get inoculum levels low. This will improve spray efficiencies before the warm wet summer when yellow Sigatoka pressure is heaviest. In the wet season, deleafing can extend to every 6-8 weeks and during the dry season every 8-12 weeks, depending on disease pressure.

Other cultural practices

Other cultural practices, such as block design, are also important for managing the disease. Maximising airflow through a block will assist in creating conditions that minimise disease development. This includes the following considerations:

  • Avoid placing blocks close to waterbodies, such as dams, as it will only promote the disease due to the high humidity associated with them.

  • Lower density plantings are recommended to promote a drier microclimate.

  • Maintain good drainage to ensure water does not sit within interrows.

  • Reduce plant-to-plant contact by removing unnecessary suckers.

Download this information as a factsheet

More information

Videos

Overview of leaf spot diseases and their impact

Yellow Sigatoka – Life cycle and how it spreads

Yellow Sigatoka – Management tips for growers

For more information contact:

The Better Bananas team
Department of Agriculture and Fisheries
South Johnstone
13 25 23 or email betterbananas@daf.qld.gov.au

This information has been produced as part of the National Banana Development and Extension Program, funded by Hort Innovation, using the banana research and development levies and contributions from the Australian Government. Hort Innovation is the grower-owned, not-for-profit research and development corporation for Australian horticulture. The Queensland Government has also co-funded the project through the Department of Agriculture and Fisheries.
Hort innovation logo

Yellow Sigatoka (leaf spot) Fungicides and options to manage the development of resistance

Fungicides and options to manage the development of resistance

Fungicides help manage yellow Sigatoka in the tropics. We need to better manage their use or risk losing them forever.

Historical testing of yellow Sigatoka isolates in Far North Queensland has confirmed loss of sensitivity to strobilurin fungicides (e.g. Cabrio® and Flint®) and triazole fungicides1 (e.g. Folicur ®, Opus ® and Tilt ® are trade names).

There are relatively few new fungicides being registered, so it’s important to manage the usage of chemicals available today so they are effective in the future. Every grower needs to do their bit in protecting the industry. Here are several ways to manage fungicide resistance.

Deleaf spotted leaf, don't spray it!

The most critical part of managing Sigatoka disease in banana is deleafing (Figure 1). It can reduce ascospore production by up to 85%, significantly reducing the potential for disease resistance to develop on your farm and neighbouring farms. 

Fungicides are not effective on visible necrotic spots and applying products to infected leaf material encourages fungicide resistance. Therefore, leaf spot infected leaves should be removed before fungicides are applied.

Deleafing is important all-year-round, however, spring is the key period. Ensure all spotted leaves are removed to reduce the level of disease prior to summer. Warm and wet summer conditions favour yellow Sigatoka developing, making it more difficult to manage.

Figure 1 Regular deleafing is critical for managing yellow Sigatoka.

Know the fungicide groups

Both protectant and systemic fungicides are available for managing yellow Sigatoka. Each chemical group has a different mode of action and has an important role to play in a spray program. This influences when these products should be used. A complete list of fungicide groups registered for managing yellow Sigatoka in the banana industry is in Table 1.

Protectant fungicides help prevent yellow Sigatoka developing and should form the bulk of your applications throughout the year. Mancozeb should always be applied with paraffinic oil, while chlorothalonil should never be applied with oil. Therefore, growers cannot alternate between mancozeb and chlorothalonil. 

Systemic fungicides used in bananas are more accurately described as being ‘translaminar’, passing through the leaf tissue from one leaf surface to the other. This means the fungicide moves below the surface of the leaf but is not truly systemic because its movement is limited. The common misconception is that systemic fungicides used in bananas can ‘kill’ existing disease. While they are often referred to as ‘curatives’, their activity is limited to early stages (Figure 2) of the disease (Stages 1 to 2b). Once necrotic leaf spot symptoms are visible to the naked eye, fungicides will not arrest development. Fungicide application to lesion stages 3, 4 and 5 could encourage fungicide resistance to develop. Therefore, apply systemic fungicides when conditions are conducive to the disease developing in warm and wet weather conditions, and not when you can see symptoms.

Rotate fungicide groups

Chemicals, including fungicides, are grouped based on their mode of action and chemical structure.

There are nearly 200 trade names of fungicides registered to manage yellow Sigatoka in bananas. Know which groups the products belong to and ensure that systemic chemical groups are rotated.

It is important to rotate between the groups, not simply between products in these groups to avoid resistance. For example, switching between propiconazole and difenoconazole is not considered ‘rotating’ as both actives belong to Group 3.

Figure 2 Stage 2b lesions on banana leaf. Systemic fungicides have no effect on lesions beyond 2b.

Follow the product use recommendations

There are restrictions that apply, especially to the systemic fungicides, in relation to:

  • maximum number of applications per year
  • maximum number of consecutive sprays of the same fungicide group
  • restricted ‘no spray’ periods when some fungicide groups are not permitted for use

Table 2 is based on CropLife Australia’s Fungicide Resistance Management Strategy for the Far North Queensland banana industry. This resistance strategy came into effect on 25 June 2015 and as product labels are renewed they will refer to this strategy.

Group 7 and Group 11 products must only be applied in a mixture with another fungicide from a different activity group, registered for control of yellow Sigatoka, at the full registered rate. Each fungicide included in the mixture counts towards the maximum number of spray applications allowed for Group 3 or Group 9 fungicides.

A resistance strategy is also available for areas outside of Far North Queensland. Refer to CropLife’s website for details.

Table 1 Fungicides currently registered in banana crops for management of yellow Sigatoka as of October 2023. Always check registration status and product label prior to use, through the APVMA website.

* Trade names are used as an example only, other products may exist, and one name is chosen for simplicity and space.

Use the recommended label rate

Thorough spray coverage

The application rates listed on the product label have been proven through field efficacy trials. Therefore, halving or increasing the rate of a fungicide product can encourage the development of a resistant population of the yellow Sigatoka organism.

Always check the label for the correct application rate, as different trade names may have varying amounts of an active ingredient. For example, the active ingredient propiconazole (Group 3) appears in more than 50 products registered for yellow Sigatoka management in bananas, and among this list are four different concentrations of the active ingredient.

For the fungicide to have the best chance at protecting the leaf from further infections, thorough spray coverage is required. This is especially important for the protectants which only work on the leaf area they come into direct contact with, and as already mentioned, the systemics have limited ability to move within the leaf.

Table 2 CropLife Australia’s fungicide resistance strategy for the Far North Queensland banana industry (Valid 14 July 2023).

** IMPORTANT - Loss of sensitivity to yellow Sigatoka in banana among products in Groups 3 & 11 has been recorded in Far North Queensland production areas.
Reference:
1. Grice, K. (2009) Assessment of yellow Sigatoka populations in banana for loss of sensitivity to the fungicides trifloxystrobin and tebuconazole. 2009. Queensland Primary Industries and Fisheries.

Download this information as a factsheet

More information

New video available - Management tips for growers!

This video advises on the current best practice for managing yellow Sigatoka. Managing the disease requires a combination of timely deleafing and appropriate fungicide application. Tegan Cavallaro and David East from the Department of Agriculture and Fisheries discuss what’s involved.

For more information contact:

The Better Bananas team
Department of Agriculture and Fisheries
South Johnstone
13 25 23 or email betterbananas@daf.qld.gov.au

This factsheet has been produced as part of the National Banana Development and Extension Program which is funded by Hort Innovation, using the banana industry research and development levies and contributions from the Australian Government. Hort Innovation is the grower-owned, not-for-profit research and development corporation for Australian horticulture. The Queensland Government has also co-funded the project through the Department of Agriculture and Fisheries.
Hort innovation logo

Pests, diseases & disorders

Common pests, diseases & disorders of banana

Bananas can be impacted by a range of pests, diseases and disorders. Having appropriate management practices in place is essential for ensuring good quality fruit. Below is some general information on some of the major pests, diseases and disorders of banana. It also includes summaries of recent trial work undertaken by researchers from the Department of Agriculture and Fisheries.

If you are having problems identifying what is causing damage to your crop check out the Better Banana’s problem solver section here

20230628_093139

Pests

Diseases

Physiological issues and disorders

For more information contact:

The Better Bananas team
Department of Agriculture and Fisheries
South Johnstone
13 25 23 or email betterbananas@daf.qld.gov.au  

This information has been developed as part of the National Banana Development and Extension Program (BA19004) which is funded by Hort Innovation, using the banana industry research and development levies and contributions from the Australian Government. Hort Innovation is the grower-owned, not-for-profit research and development corporation for Australian horticulture. The Queensland Government has also co-funded the project through the Department of Agriculture and Fisheries.
Hort innovation logo